Configuring your first simulation
This page steps through how to configure a simulation. Prior to trying this tutorial, make sure you have SST installed (both sst-core and sst-elements). You'll also need to be comfortable writing Python scripts, using a text file editor, and using a command line interface.
Components, events, links, ports, what?!
Before configuring a simulation, let's review the basic SST building blocks.
Components
A component is a model. While most SST components relate to computer systems (e.g., a processor, network router, or DRAM), a component can be anything. The simpleSimulation model in sst-elements, for example, models a car wash. By combining different components (e.g., a processor, cache, and DRAM) in a simulation, we can define a system. When SST runs in parallel, it divides the simulation at a component granularity across different threads and/or ranks.
Events
Components interact with each other by sending Events. What an event contains is up to the components that define it. Events are sent over links (up next).
Links
Links define connectivity between components. Two components can directly exchange events if and only if they have a link between them. This restriction fundamentally enables SST's parallelization mechanisms.
Ports
Ports are defined by components and are attachment points for Links. Ports have names so that components can have multiple ports and differentiate between them. For example, a cache might have two ports, one to an upper level cache and one to a lower level cache.
Putting it together: the SST Graph
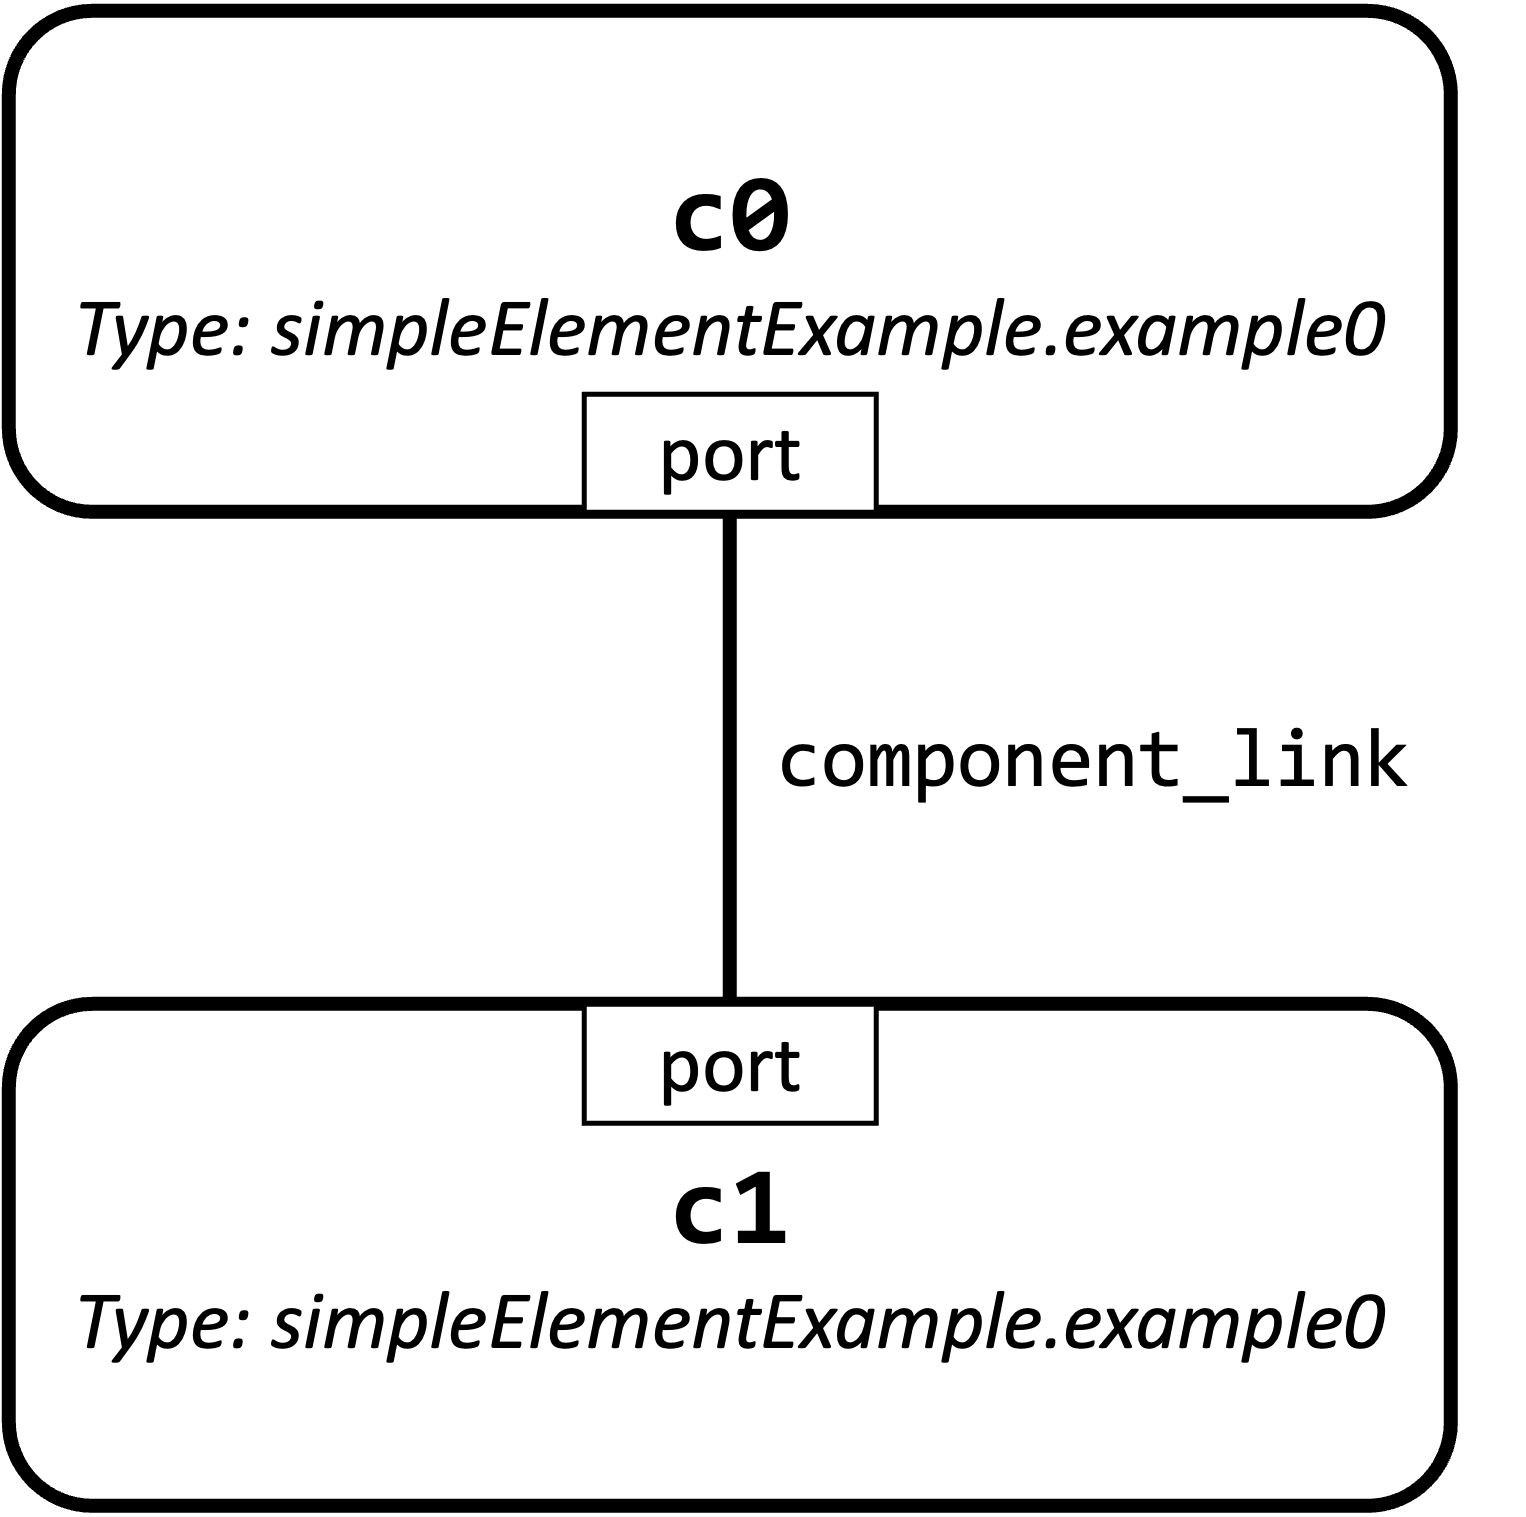
The SST configuration file describes the system to be simulated in terms of components and links between those components' ports. If this sounds a little like a graph, that's because it is! SST simulations can be represented as a graph where Components (models) are vertices and Links are edges. In this tutorial, we're going to build a configuration file for the graph shown below.

This simulation has two components which send each other messages via the link between them. We will use the example0 component from sst-elements' simpleElementExample library. Each example0 component sends a certain number of events, controlled by a parameter, to the other component and then ends the simulation. The events have a field specifying a size in bytes which can also be changed via a parameter.
Step 1: Find out information about the components you want to simulate
In the configuration file, we'll need to tell SST which components we want and parameterize the components. Then we'll need to connect the components by creating Links between each component's ports. You can use SST's sst-info tool to find out information about a component, such as the names of its ports and what parameters can be set.
SST uses a library.component_name syntax to uniquely identify component types so the full type for example0 is simpleElementExample.example0.
$ sst-info simpleElementExample.example0

PROCESSED 1 .so (SST ELEMENT) FILES FOUND IN DIRECTORY(s) /Users/user1/sst/build/sst-core/lib/sstcore:/Users/user1/sst/build/sst-elements/lib/sst-elements-library:/Users/user1/sst/sst-elements/src/sst/elements/osseous
Filtering output on Element = "simpleElementExample.example0"
================================================================================
ELEMENT LIBRARY 0 = simpleElementExample ()
Components (8 total)
   Component 6: example0
      Description: A component that sends a specific number of events and then ends simulation
      ELI version: 0.9.0
      Compiled on: Jan 22 2024 09:27:15, using file: ./example0.h
      Category: PROCESSOR COMPONENT
      Parameters (2 total)
         eventsToSend: How many events this component should send.  [<required>]
         eventSize: Payload size for each event, in bytes.  [16]
      Ports (1 total)
         port: Link to another component
      SubComponent Slots (0 total)
      Statistics (0 total)
      Profile Points (0 total)
      Attributes (0 total)
This shows that simpleElementExample.example0 has two parameters, eventsToSend and eventSize. We will need to set eventsToSend since it is [<required], but eventSize has a default of 16 so we only need to set that if we want a different value. Likewise, when we create a link between our two instances of simpleElementExample.example0, we'll connect it to the port named port on each component. Given this information, here's a more detailed picture of the configuration we'll create. SST requires each component to have a unique name so we'll use c0 and c1. These names are used by SST when generating statistics and printing output, among other functions.
Step 2: Create a file and import the SST module
Now that we've defined what to simulate, we need to create an input file. We will use Python. Create a file called tutorial.py and then add an import statement to import the sst module. This will let us use the SST configuration APIs.
$ vi tutorial.py
import sst
Step 3: Define the components
Use the sst.Component() function to create the components, providing the name of the component and its type. This call returns an object that we can use in the rest of the script to refer to the component. Here, component c0 maps to object component0 and c1 maps to object component1. SST uses a library_name.component_type syntax to identify component types, so both components are of type simpleElementExample.example0.
import sst

component0 = sst.Component("c0", "simpleElementExample.example0")
component1 = sst.Component("c1", "simpleElementExample.example0")
Step 4: Parameterize the components
Set the parameters on each component as shown in the figure above. There are a couple ways to do this, we'll do it by passing a dictionary of parameter : value pairs to each component we created in step 1. Because we're setting the same parameters on each component, we'll pass the same dictionary to both.
import sst

component0 = sst.Component("c0", "simpleElementExample.example0")
component1 = sst.Component("c1", "simpleElementExample.example0")

param_set = { "eventsToSend" : 20, "eventSize" : 32 }
component0.addParams(param_set)
component1.addParams(param_set)
Step 5: Connect the components
The last thing we need to do is connect the components so that when c0 sends an event, it goes to c1 and vice-versa. To do this, we use SST's Link and connect calls. Before we get to that though, we need to make one more decision: what the latency between the components should be. A few things to consider:
- The latency will be the time it takes between when c0 sends an event and c1 receives it and vice-versa. Components can add additional latency when sending events but they cannot reduce the latency beyond what the configuration script defines.
- The latency does not need to be symmetric - we can use a different latency when sending from c0 to c1 than when sending from c1 to c0.
- The latency cannot be 0. This is a foundational requirement as SST uses the latency for identifying synchronization intervals in parallel simulations.
- By default, SST counts time in units of picoseconds. If we use a smaller latency, we'll need to reduce that unit so that we can count at the finer granularity. If we have a much larger (e.g., hours) latency, we will want to increase the unit so that SST's time counter (a 64-bit unsigned integer) doesn't roll over.
Given those considerations, in this example we'll set a symmetric latency of one nanosecond ("1ns") between the components. Create a link with a unique name, and connect each side of the link to one of the components using a tuple that includes the component instance, name of the port to connect to, and the latency from that component to the other side of the link.
import sst

component0 = sst.Component("c0", "simpleElementExample.example0")
component1 = sst.Component("c1", "simpleElementExample.example0")

param_set = { "eventsToSend" : 20, "eventSize" : 32 }
component0.addParams(param_set)
component1.addParams(param_set)

link0 = sst.Link("link_c0_c1")
link0.connect( (component0, "port", "1ns"), (component1, "port", "1ns") )
Step 6: Run the simulation
Now, run the simulation by passing the Python script you created to sst as shown below. We did not enable any statistics so the only thing SST will return is a statement of how long the simulation took.
$ sst tutorial.py
Simulation is complete, simulated time: 22 ns
Next steps
Visit the simulation configuration guide and the configuration API documentation for more information about other capabilities.